How to Build an Infinitely Scalable Video Captioning Service with Firebase and Kubernetes
The latest advancements in cloud computing allow us to build highly scalable web services. Here's how we built Captionly.

When I was a kid, I loved playing Lego. It was magical seeing anything from castles to cars appear out of the same colourful building blocks.
Today, I love tinkering with software frameworks and Google Cloud products, building solutions to problems that I encounter in life. Just like with Lego – there is an infinite number of combinations. It only takes a little bit of imagination and continuous experimentation to put these building blocks to good use.
Last summer, I started recording short videos aiming to practice speaking on camera and build my personal brand. Yes, marketing is also one of those Lego blocks I discovered a couple of years ago.
I noticed that the best videos on social media have captions to catch the attention of people scrolling through their newsfeed with the sound off. It's also a matter of respect to people who can't hear.
I started looking for a solution that would allow me to record a video on the go, send it somewhere and get back a captioned version of it.
Either I wasn't patient googling it or those few web services, like Kapwing and Zubtitle, didn't have their SEO set up, I couldn't find anything. Funnily enough, I started seeing their ads right after I finished working on Captionly!
I decided to build such a service myself out of the available "Lego blocks".
In this article, I'm going to show you how I built Captionly – a web service that allows people to do just that – generate a captioned version of their videos.
What If It Doesn't Work?
But first, have you ever had such moments when you wanted to solve a problem but wasn't sure how? You decide to try an approach, but you aren't sure if it's going to work and if it actually makes sense. Such doubts nag you as you're building your solution, but you carry on nonetheless.
Then, sometime later, you hear someone talking about a similar approach or architecture at a conference. You experience a feeling of relief, knowing that you were right along the way! It boosts your confidence, and you become even more brave experimenting with your ideas.
Do you remember such moments in your life?
On 20-21st November 2019, Google held their annual event in London – Google Cloud Next. At one of the presentations, Bret McGowen showed how to build a serverless online shop – pretty much the same way I made my Captionly – with AppEngine and Cloud Functions. That's when I realised that what I developed made sense!
Building Captionly

Getting a text version of captions wasn't a problem. I knew about Rev.com – a service set up by guys from MIT many years ago. They built a network of professional captioners and throughout the years accumulated a high-quality dataset to train AI models outperforming Google and IBM! Last summer, they launched Rev.ai offering AI-generated captions with quality slightly lower than human captions but cheaper and much faster.
Besides, Rev have a convenient API allowing to automate the process of generating either human- or AI-made captions, transcripts and translations.
To build a service that returns captioned videos, we require three elements:
- a website to let users upload a video
- an integration with Rev to get a text file with captions
- a service that embeds the captions into the video
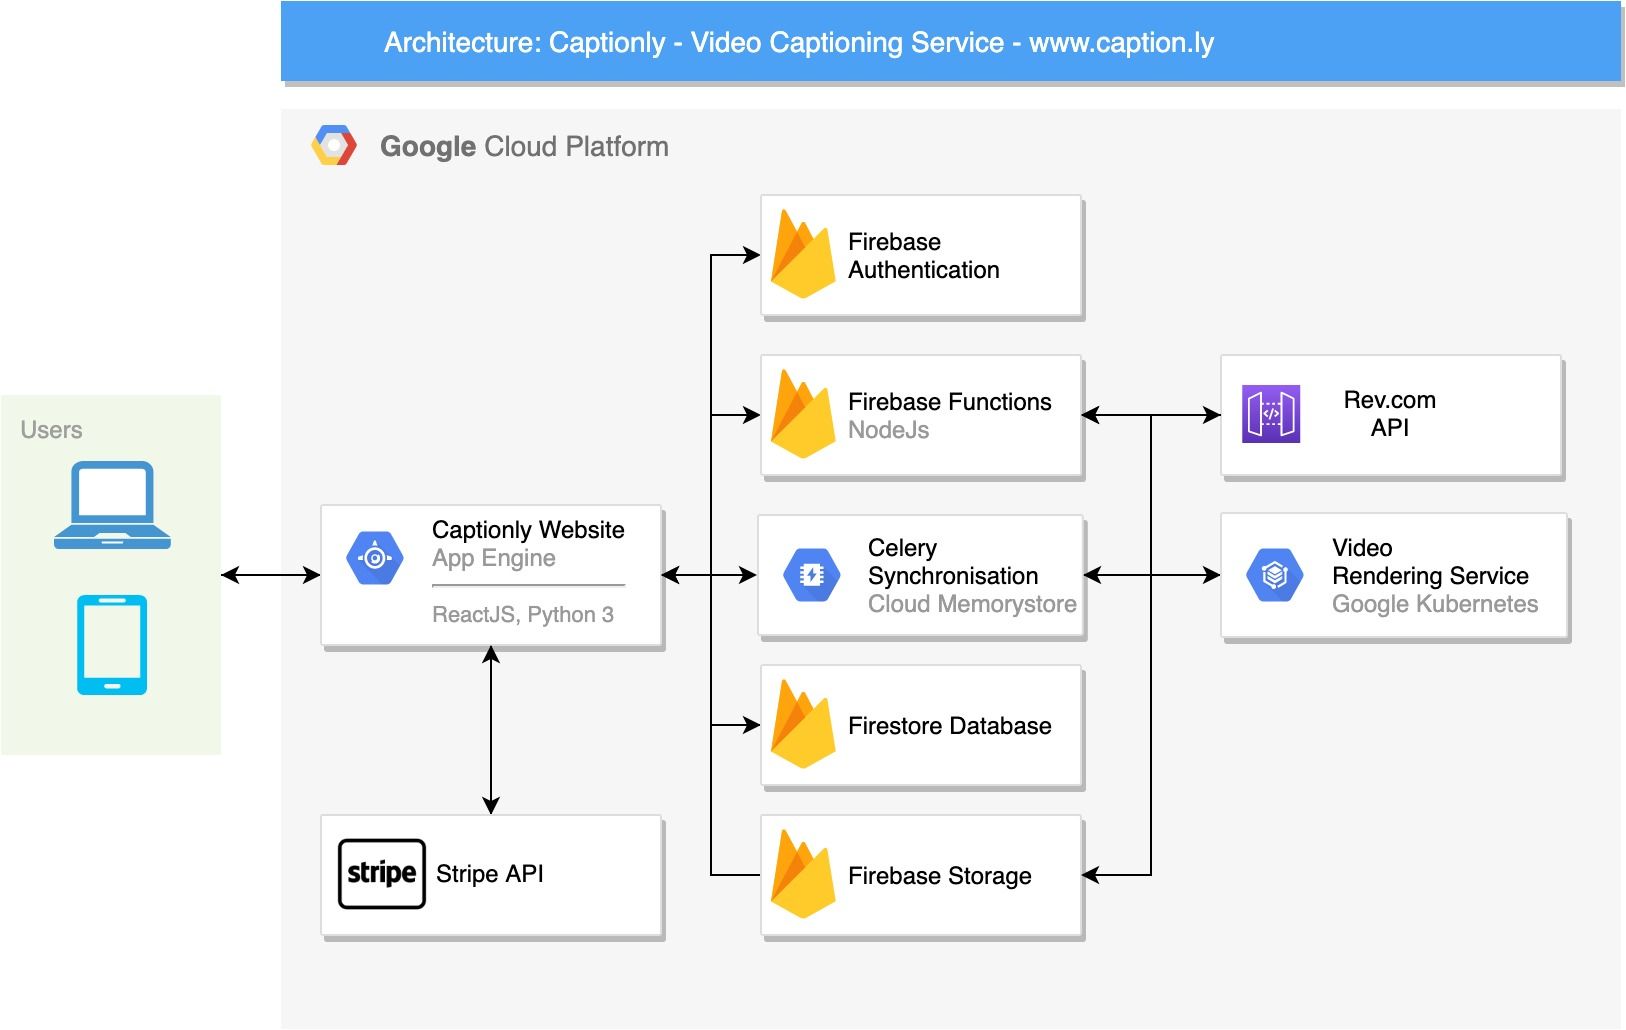
I decided to try Firebase – a Google service that comes with the Firestore database, Cloud Functions and several other services that help build serverless web and mobile apps.
Firebase also allowed me not to worry about implementing secure user authentication because it provides a way to take care of that very elegantly supporting multiple social media logins.

To build the frontend, I used the React + Material-UI + Firebase boilerplate app that comes with ready-made integrations with Firebase Authentication. I combined React frontend with the Flask backend running on Google Cloud AppEngine Standard Environment.
Firebase Storage, which runs on Google Cloud Storage, provides a JavaScript SDK that I used to let Captionly users upload their videos directly to the Cloud Storage through the web browser. Firebase Storage comes with a way to define security rules making sure that users can read and write only their files.
When a user uploads her video, I create an entry in Firestore capturing the details of the order, such as the Storage path to the uploaded file.
Firestore allows writing Cloud Functions that get triggered automatically whenever a change happens in the database. We write such functions using JavaScript or TypeScript.
Once the user's order status changes to "Video Uploaded" in the database, a Firestore Function gets triggered to create a new order with Rev through their API. The order status gets changed to "Captions Order Submitted".
It takes a while for Rev to process the video and generate captions. Depending on the user's choice at Captionly, it takes from about an hour for high-quality human-made captions to a couple of minutes for AI-made captions.
When Rev completes the order, they trigger an endpoint that I created in Cloud Functions. The function downloads the text file with captions to the corresponding order folder in Cloud Storage. The order status gets changed to "Captions Created", followed by "Rendering Started".
This status change triggers the Firebase function again that sends the order details to my video rendering service.
Video Rendering with FFmpeg
Video rendering is an interesting problem. There are several video editing solutions ranging from paid ones like Adobe Premiere and Apple Final Cut Pro X to free ones. However, I didn't need a user interface to embed captions into videos. I wanted a command-line version to automate the process entirely.
That's how I discovered FFmpeg – an open-source console-only application that allows you to do anything you can imagine with videos as long as you are patient figuring out how to encode what you want to do using the command-line options.
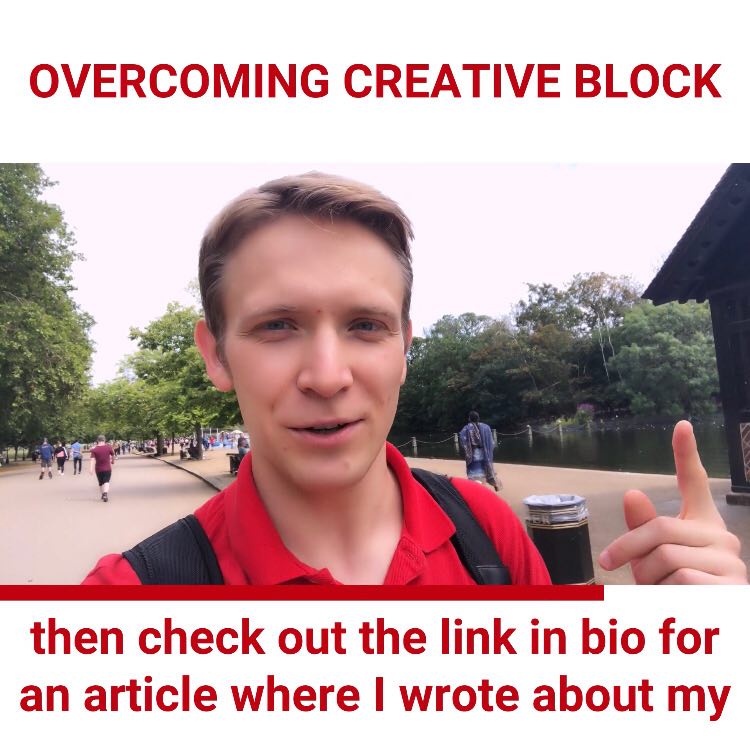
To give you an idea, here's how to ask FFmpeg to embed captions into your videos to get a result like this:

ffmpeg -y -f lavfi -i color=color=#BF0210:size=3840x40 -t 38 -pix_fmt yuv420p dark_red_2000_27.mov && ffmpeg -y -i creative_block.MOV -i dark_red_2000_27.mov -filter_complex "[0:v]pad=w=iw:h=3840:x=0:y=840:color=white[padded];[padded][1:v]overlay=x='-w+(t*w/38)':y=3000[padded_progress];[padded_progress]drawtext=fontfile=/fonts/roboto/Roboto-Bold.ttf: text='OVERCOMING CREATIVE BLOCK': fontcolor=#BF0210: fontsize=200: x=(w-text_w)/2: y=(840-text_h)/2[titled];[titled]subtitles=creative_block.srt: force_style='Fontname=Roboto Bold,PrimaryColour=&H1002BF&,Outline=0,Fontsize=16,MarginV=0020'" -codec:a copy creative_block_padded.mov
I created a service that takes a video file, a corresponding text file with captions and merges them delivering a captioned version of the video.
Video rendering is a memory- and CPU-intensive process, so I must use powerful-enough virtual machines to accomplish the task.
Besides, I wanted my video rendering service to be scalable and automatically spin up necessary computing resources depending on the workload – the number of orders submitted through Captionly.
I decided to leverage the power of Google Cloud Kubernetes and its capability to scale both horizontally and vertically.
I didn't have any experience with Kubernetes when I started this project, so it was a steep learning curve for me understanding the relationships between nodes, pods, containers, deployments, and services.
I created my Kubernetes cluster with a node pool specifying that I want it to be horizontally and vertically scalable. In the minimal configuration, when there is no workload, my cluster runs a little preemptible virtual machine. When video orders start flowing in, Kubernetes provisions additional pods of my rendering service. When the number of pods becomes too large, Kubernetes spins up additional nodes to allocate new pods there. If an order comes in with a lengthy video that requires more computing power and memory, Kubernetes spins up a more powerful VM according to the limits I had predefined.
Such a setup is incredibly cost-effective and powerful to scale pretty much infinitely.
To orchestrate the video rending jobs, I set up Celery using Google Cloud Memorystore – a managed Redis service – as a synchronisation backend.
After the order status in Firestore gets changed to "Rendering Started", the Cloud Function sends the order details to my endpoint in AppEngine. The AppEngine function creates an entry in Celery.
Celery triggers the job in Kubernetes that pulls the video and the captions file from Cloud Storage and launches FFmpeg to render the video. The completed video gets uploaded to Cloud Storage, and the rendering service calls a Cloud Function, which updates the order status to "Rendering Completed" and sends the user a notification email.
The user can watch how the status of the order changes in real-time in her account on the website without refreshing the page. Firestore can notify subscribers – our website in this case – about any changes that happen in the database.
Accepting Payments with Stripe
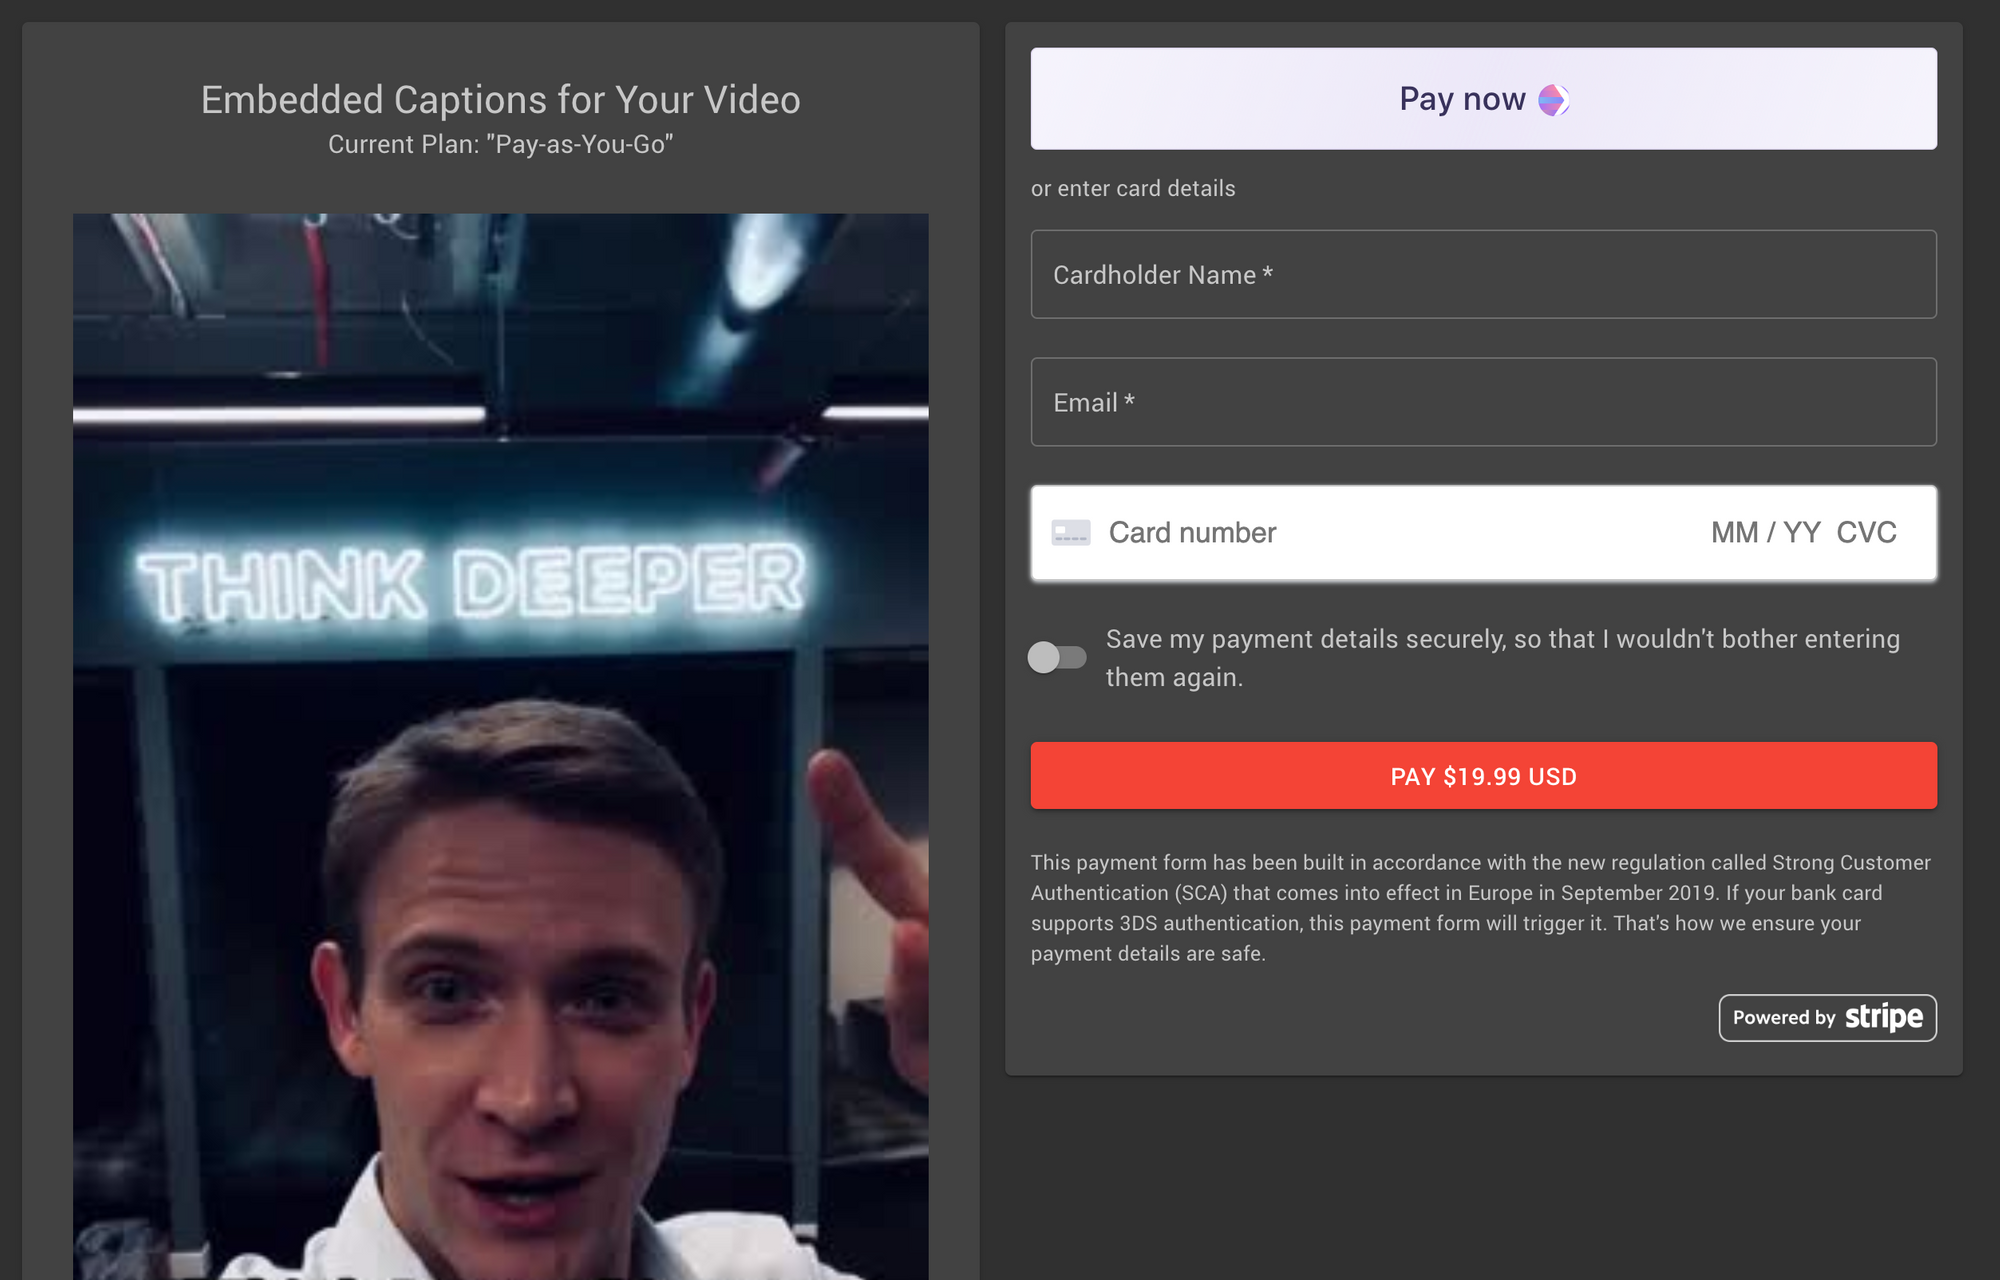
To accept payments for the Captionly orders, I built an integration with Stripe using their powerful and very flexible Python API and ReactJS elements for the payment form.
I wanted the payment form to look very natural on the website and also support subscriptions, as well as Apple Pay and Google Pay.

It required me to set up an additional endpoint to listen to events sent by Stripe when payments get processed.
Such setup allowed me to stay PCI compliant and satisfy SCA requirements by not storing or processing user payment details at all by myself but rely on Stripe.
It's Your Turn!
This experience of building a fully serverless infrastructure paired with a scalable Kubernetes service made me even more convinced that we have incredible power at our disposal to build anything we can imagine.
The trick is to be able to find problems – that's the hardest bit!
I encourage you to experiment yourself with Cloud Services because that's how you come to realise what is possible to build. It also helps you keep your technical skills at peak and lets you quickly prototype with your ideas.
In the end, is there anything more exciting than seeing your ideas come to life?
If you've read this far, I invite you to give Captionly a try using this 25% discount link valid for any subscriptions that we offer.
If you wonder what to talk about, here's a short video on how to get ideas for your videos! In addition, check out my Instagram @dimileeh to watch videos I created using Captionly. Good luck!
